 Shrimpware
Project: Passive Infrared Motion Detector
Difficulty: Easy
for Arduino
Order your own BreadBox kit
Overview
Passive Infrared (PIR) Motion Detectors are used to sense human motion in a broad field of view. In this project we will hook a PIR to the Arduino and use it to move a servo whenever motion is detected.
Parts
In addition to a Shrimpware BreadBox with a sensor shield you will also need:
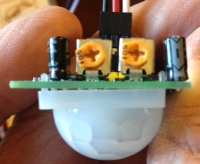
- PIR motion sensor. I used an HC_SR501 which is close to the DYP ME003. I bought mine at Adafruit.
- One three wire cable, like a servo extension cable.
Tools
Soldering iron, wire cutters, wire strippers, electrical tape, Phillips screw driver
Step by Step
- The cable - We will connect the cable to analog input 2 on the
sensor shield. Note that the sensor shield pins are in the order
Ground / VCC / Sensor. The pins on the PIR are Ground / Output /
VCC.
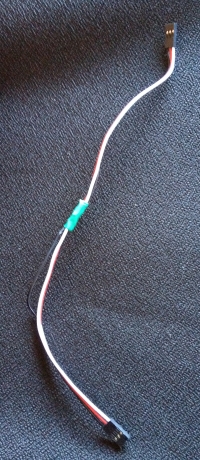
 Take your three wire cable. In the middle of it gently pull
apart the three wires. The wires on mine were black, red, white. I
decided to make the black Ground, so leave it alone.
Take your three wire cable. In the middle of it gently pull
apart the three wires. The wires on mine were black, red, white. I
decided to make the black Ground, so leave it alone.
Cut the red and white wires. Strip both ends and solder them back together red to white, and white to red.
Use some electrical tape to cover the solder joints. -
 The
PIR - Connect one end of your cable to the PIR with the black wire
on the pin marked Ground.
The
PIR - Connect one end of your cable to the PIR with the black wire
on the pin marked Ground.
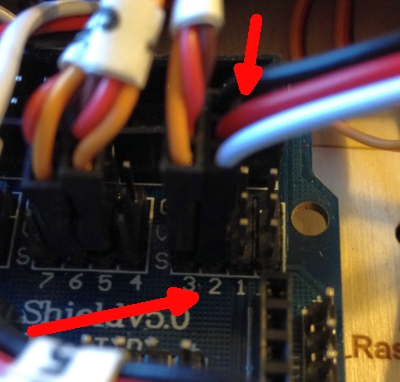
Connect the other end of your cable to the sensor shield three pins for analog input 2; again the black wire should be on the pin marked Ground.
Here you see it attached to the SainSmart Sensor Shield version 5.0. - Connect it - Now connect your typical two USB power
cables. One between your computer and the Arduino board and one to
the sensor shield. I have tried running this sensor from the Arduino
power but it kept pulling down VCC enough to cause the Arduino to reset
over and over. I think a second USB power supply is a must.
NOTE: Your sensor shield may have a jumper to indicate whether its power will come from the Arduino board or from an external power source. Be sure this jumper is set to use the external power source. If not, you could damage your Arduino or your computer's USB power. -
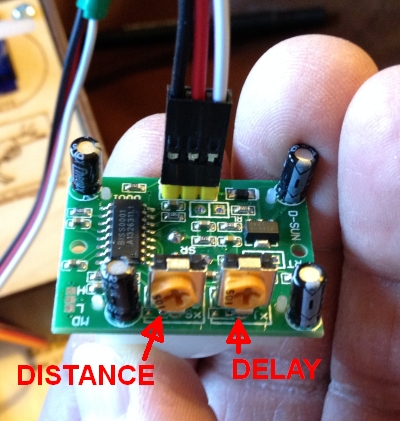 Adjust the PIR - There are two little potentiometers on this
PIR.
Adjust the PIR - There are two little potentiometers on this
PIR.
One controls sensitivity (or distance) and one controls how long a motion will be reported after the motion stops (no easier way to say that but the manufacturer calls this "delay").
There is also a built in 4 second delay from the time motion stops being reported until the PIR will be ready to report a new motion; I call this the reset timer.
Use a Philips screw driver to turn the delay pot all the way counter clockwise. This sets the "delay" to about 5 seconds. The distance setting is not important at this time. - Software - Cut and paste the software below into your Arduino IDE
- Run it - Compile the software and download it to your Arduino. (The "go" button in the IDE.) Once the software is downloaded you can open the Arduino serial monitor (CTL SHIFT M). You should see "Initialized" on the screen. Then a count down. Then "Ready".
Initialized
Time waiting: 1001
Time waiting: 2002
Time waiting: 3003
Time waiting: 4004
Ready
Operation
Point the dome of the PIR away from you and anyone else. Wait for the serial monitor to display "Ready". Now move your hand in front of the PIR. The Serial monitor should display "Motion Detected! Waiting for delay timer." Once the delay timer is over you will see "Motion Stopped." Then the serial monitor should display a count down of 4, 3, 2, 1 and display "Ready" again. Here's a little movie of it in action.
This is the typical cycle for the PIR software I've provided.
- Ready
- Waiting for movement to be detected
- Movement is detected
- Continue to report motion for the time specified by the "delay" potentiometer.
- Movement is stopped.
- Wait a built in 4 seconds.
- Go to step 1
Adjustment
You can increase the time indicated in step 4 above by turning the delay potentiometer clockwise. I moved it about 25% of a rotation and the motion reporting time was increased to about 45 seconds. All the way to the right is about 300 seconds. A short time is good for reacting to motion starts and stops. A long time is good for running a device - imagine turning on a video recorder whenever motion is reported.
The other potentiometer adjusts the sensitivity of the detector. According to the vendor sensitivity can be adjusted between 0.7 meters and 6.5 meters. For me, in practice, the detector was always sensitive to motion even when it was set low and I was across the room.
Code
/* * PIR Motion Sense and then Move Servo 3 * Jim Schrempp 2013 */ #include<Servo.h> int ledPin = 13; // choose the pin for the LED int inputPin = 2; // choose the input pin (for PIR sensor) int pirState = LOW; // we start, assuming no motion detected int val = 0; // variable for reading the pin status long timeOfLastChange = 0; // how long did the detection or no-detection last. long lastPrintTime = 0; // last time we printed the countDownTimer long timeOfMovementStopped = 999999; // the time when we last transitioned to stop boolean readyMessageSent = false; // when true we need to send a ready again message const long c_waitTimeMilliseconds = 4000; // number of milliseconds after motion stops before it can be detected again Servo servo3; const int c_servoPositionWhenMotion = 0; const int c_servoPositionNoMotion = 90; void setup() { pinMode(ledPin, OUTPUT); // declare LED as output pinMode(inputPin, INPUT); // declare sensor as input Serial.begin(57600); servo3.attach(3); servo3.write(c_servoPositionNoMotion); timeOfMovementStopped = millis(); Serial.println ("Test program for Passive Infrared Detector"); Serial.println ("Adjustments:"); Serial.println (""); Serial.println (" pot1 pot2 "); Serial.println ("------------------"); Serial.println (" xxxxxxxxxxxx"); Serial.println (" xxxxxxxx"); Serial.println (" xxxxx"); Serial.println (""); Serial.println ("pot1: sensitivity."); Serial.println ("pot2: how long it holds high after detect. 0 - 300 seconds. clockwise is longer."); Serial.println (""); Serial.println("Initialized"); } void loop(){ val = digitalRead(inputPin); // read input value long currentTime = millis(); // If the state has changed from High to Low, we tell how long it stayed High // This time is controlled by the position of Potentiometer 2. if (val != pirState) { // state has changed if (pirState == HIGH) { Serial.print ("Time high "); float elapsedTime = (currentTime - timeOfLastChange) / 1000; Serial.println (elapsedTime); } timeOfLastChange = currentTime; } // If the state has changed, then we will move the servo if (val == HIGH) { // check if the input is HIGH if (pirState == LOW) { // we have just turned on Serial.println("Motion detected! Pot2 hold timer running."); pirState = HIGH; servo3.write(c_servoPositionWhenMotion); timeOfLastChange = currentTime; } } else { if (pirState == HIGH){ // we have just turned off Serial.println("Motion ended! Now wait."); pirState = LOW; servo3.write(c_servoPositionNoMotion); timeOfLastChange = currentTime; timeOfMovementStopped = currentTime; readyMessageSent = false; } } if (currentTime - timeOfMovementStopped <= c_waitTimeMilliseconds + 25) { // less than the wait time to detect new movement if (currentTime - lastPrintTime > 1000) { // print only once a second Serial.print ("Time waiting: "); Serial.println (currentTime - timeOfMovementStopped); lastPrintTime = currentTime; } } else { if (!readyMessageSent) { Serial.println ("Ready"); Serial.println (" "); readyMessageSent = true; } } }
(c) 2013Shrimpware LLC All Rights Reserved